지난 포스팅에서 Redux의 기본 개념을 설명했다면 이번 포스팅에서는 실제로 React를 이용한 Redux를 사용해보도록 하겠다. 물론 React에 프로젝트 작성에 대해 알고 있다면 이번 포스팅의 방법도 어렵지 않게 할 수 있다. 그렇다면 실제로 어떻게 사용하는지 확인해보도록 해보자. 이번 Redux에서는 기본적인 기능에 추가로 Selector와 Action을 쉽게 불러올 수 있는 Redux Hooks를 이용해보았다.
자세한 파일 확인과 내용을 보고 싶다면 Git Repository를 올려놓았으므로 혹시 궁금한 것이나 피드백으로 올려주시면 정말 감사드리겠습니다.
예시로 올린 웹페이지는 간단한 숫자 증가 및 감소형태의 액션을 제작하였다.

Install
프로젝트를 새로 생성하였으면 Redux와 React-Redux 라이브러리를 설치해주어야 한다. 해당 명령어는 다음과 같다.
1
npm install --save redux react-redux
File Tree
1
2
3
4
5
6
7
8
9
10
11
12
13
14
15
16
/ * -> 새로 생성된 프로젝트에서 변화가 있는 파일 /
src
├── App.css
├── App.js *
├── App.test.js
├── actions *
│   └── index.js * Action 모음
├── components *
│   └── Count.js * Count 컴포넌트
├── index.css
├── index.js *
├── logo.svg
├── reducers *
│   └── index.js * Reducer 모음
├── reportWebVitals.js
└── setupTests.js
React의 프로젝트를 생성하면 기본적인 src폴더에 *인 폴더를 새로 생성하고 결과적으로 나온 파일 트리이다. 우선은 개인적으로도 액션과 리듀서, 컴포넌트들은 제각각 폴더를 따로 두는 것이 좋을 것 같아 폴더를 새로 생성해보았다.
Actions
액션은 기본적으로 간단하게 어떤 액션을 지정해 줄 것인지 확인해주는 파일로 제작되었다. 우선 여기에 작성된 actions/index.js 은 이렇게 작성하였다.
1
2
3
4
5
6
7
8
9
10
11
12
13
14
15
16
17
18
19
20
21
export const ADD = 'ADD';
export const SUBTRACT = 'SUBTRACT';
export const SETZERO = 'SETZERO';

export function add() {
    return {
        type: ADD,
    };
}

export function subtract() {
    return {
        type: SUBTRACT,
    };
}

export function setZero() {
    return {
        type: SETZERO,
    };
}
actions/index.js
타입만으로 확인을 위해 ADD, SUBTRACT, SETZERO라는 제각각의 타입을 생성해 액션을 위한 dictionary에 타입을 지정해 주었다. 액션을 간단하게 이렇게 생성하였으며 이 안에 인수를 넣어서 데이터를 집어넣는 것도 가능하다.
Reducers
리듀서부터 이것 저것 넣어주어야 한다. 우선 초기 state를 생성해 Store에 넣을 state를 먼저 지정해주고, 그 후 각 액션의 타입에 대한 state의 변화를 넣어줄 예정이다. reducers/index.js 는 이렇게 작성하였다.
1
2
3
4
5
6
7
8
9
10
11
12
13
14
15
16
17
18
19
20
21
22
23
24
25
26
27
28
29
30
31
32
33
34
35
36
import { ADD, SUBTRACT, SETZERO } from "../actions";

const initState = {
    value: 0
};

const counterReducer = (state = initState, action) => {
    switch(action.type) {
        case ADD: {
            return {
              ...state,
              value: Math.abs(state.value + 1) % 10
            };
          }

        case SUBTRACT: {
            if(state.value === 0) state.value = 10;
            return {
            ...state,
            value: Math.abs(state.value - 1) % 10
            };
        }

        case SETZERO: {
            return {
            ...state,
            value: 0
            };
        }

        default:
            return state;
    }
}

export default counterReducer
reducers/index.js
여기서 초기에 지정할 initStatus를 넣은 후 counterReducer라는 함수를 생성하였다. 그리고 각 타입에 따라서 어떻게 타입을 변화시켜줄 것인지 case를 통해 작성하였다. 더 나아가서는 액션을 이 안에 작성하는 것도 가능하다.
Components
이제 액션과 리듀서를 작성하였으면 제각각 그것들을 운용할 수 있는 컴포넌트를 작성해보록 하자. 우선 간단한 컴포넌트를 위해 components/Count.js를 작성해보기로 하였다. 여기서부터는 Redux Hooks를 사용하였다.
1
2
3
4
5
6
7
8
9
10
11
12
13
14
15
16
17
18
19
20
21
22
23
24
25
26
27
28
29
30
import { useDispatch, useSelector } from 'react-redux';
import { add, setZero, subtract } from '../actions';

function Count() {
    const num = {0:'zero',
            1:'one',
            2:'two',
            3:'three',
            4:'four',
            5:'five',
            6:'six',
            7:'seven',
            8:'eight',
            9:'nine'
            };
  const dispatch = useDispatch();
  const value = useSelector(state => state.value);
  return (
    <div className="App">
      <div>
        <h1>{num[value]}</h1>
      </div>
        <button onClick={()=>dispatch(add())}>+</button>
        <button onClick={()=>dispatch(setZero())}>reset</button>
        <button onClick={()=>dispatch(subtract())}>-</button>
    </div>
  );
}

export default Count;
Components/Count.js
여기서 사용하는데 중요한 것은 useDispatch와 useSelector이다. useDispatch는 어떠한 액션을 쉽게 불러들이는 역할로 Hooks을 쓰지 않는다면 mapDispatchToProps를 사용해야하지만 상당히 복잡함을 느낄 수 있기에 간편한 useDispatch를 사용하였다. 반대로 useSelector은 reducer안의 store을 불러 그 안의 state를 가져올 수 있다. 거기다 Subscribe를 이용해 변화를 준 store의 데이터도 Selector에서 직접 받아내서 데이터의 변화를 쉽게 캡쳐할 수 있다.
App.js / index.js
두 파일들은 간단하게 구상을 하였다. 그 전에 index.js안에서는 특별히 갖추어야 할 것이 있다. 바로 store를 생성해줘야 하는 기능이 필요하다. 이것이 없으면 store가 생성이 안돼 redux를 구축할 수 없다. App.js와 index.js 를 수정해보겠다.
1
2
3
4
5
6
7
8
9
10
11
12
13
import logo from './logo.svg';
import './App.css';
import Count from './components/Count';
function App() {
  return (
    <div className="App">
      <Count/>
    </div>
  );
}

export default App;
App.js
1
2
3
4
5
6
7
8
9
10
11
12
13
14
15
16
17
18
19
20
21
22
23
24
25
26
27
28
import React from 'react';
import ReactDOM from 'react-dom';
import './index.css';
import App from './App';
import reportWebVitals from './reportWebVitals';
import { createStore } from 'redux';
import counterReducer from './reducers';
import { Provider } from 'react-redux';

const store = createStore(
  counterReducer,
  window.__REDUX_DEVTOOLS_EXTENSION__ && window.__REDUX_DEVTOOLS_EXTENSION__() // Chrome내 Redux_devtools내에 표시
  );

ReactDOM.render(
  <React.StrictMode>
    <Provider store={store}>
      <App/>
    </Provider>
  </React.StrictMode>,
  document.getElementById('root')
);

// If you want to start measuring performance in your app, pass a function
// to log results (for example: reportWebVitals(console.log))
// or send to an analytics endpoint. Learn more: https://bit.ly/CRA-vitals
reportWebVitals();
index.js
여기서 주의깊게 봐야할 것은 index.js이다. 우선 store를 생성하기 위해 createStore 함수를 사용하였고, render안에 Provider를 생성해주어야 한다. 그리고 그 안에 store는 createStore로 지정한 변수를 넣어주면 된다. 그리고 createStore 함수 안에window.__REDUX_DEVTOOLS_EXTENSION__ && window.__REDUX_DEVTOOLS_EXTENSION__() 은 chrome내 확장 프로그램인 Redux Devtools내에서도 표시를 하기위한 코드이다. 크롬 유저라면 다운받아서 사용하는데 Redux내 움직임을 확인 할 수 있어 편리한 확장 프로그램이다.
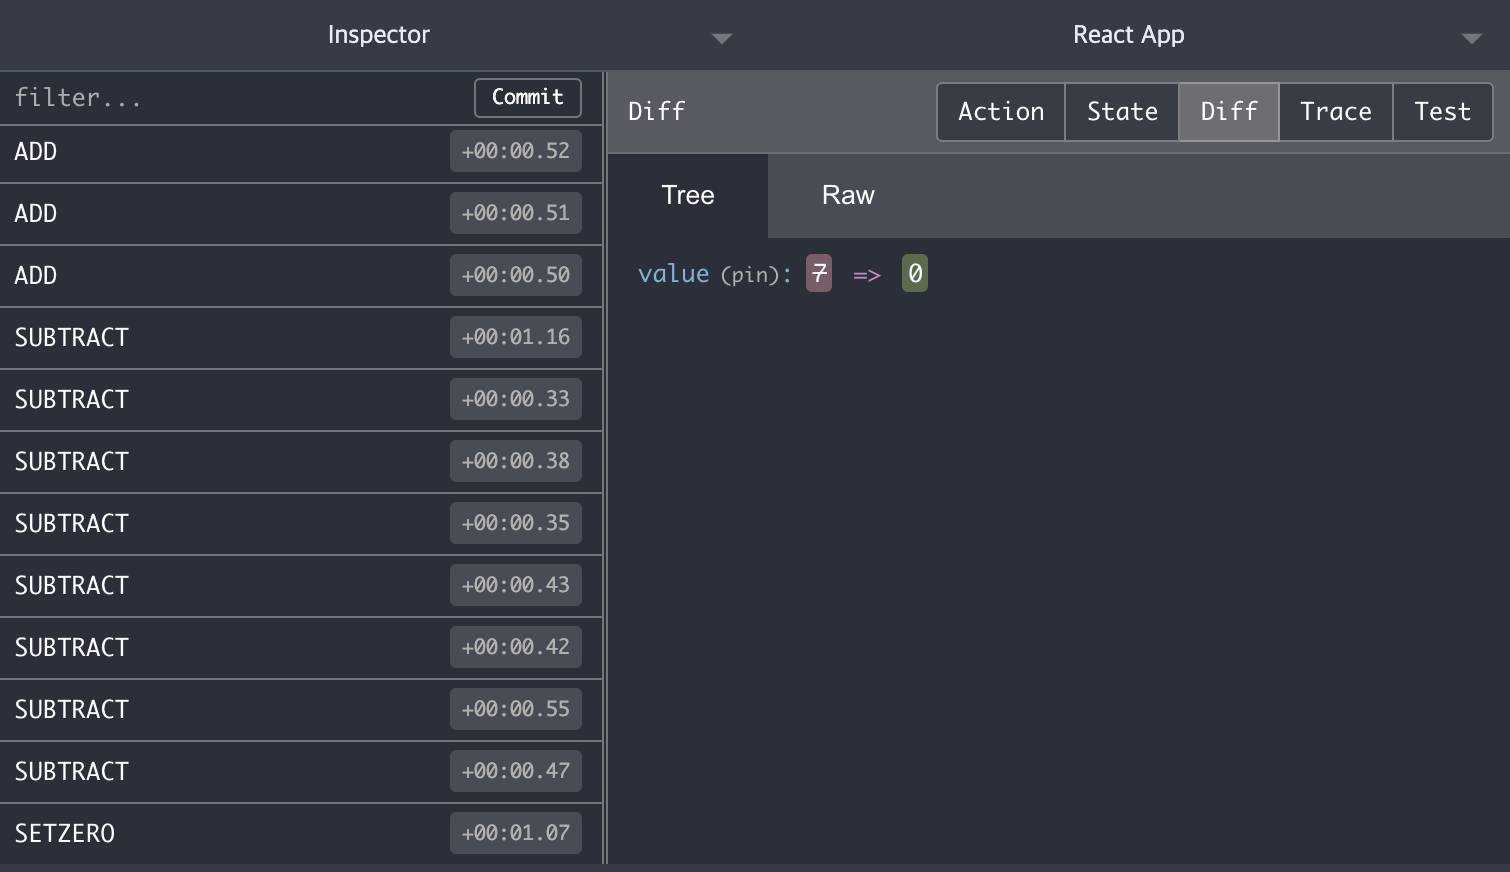
이렇게 지금까지 동작한 액션의 로그들도 확인이 가능해서 편리하다. 이렇게 작성이 완료되었으면 직접 서버를 열어서 확인해보자. 혹시 피드백 혹은 모르는 것이 있다면 댓글 부탁드립니다.